Go to the table of contents
| 3. Opening and Saving Files |
This section assumes that Osprey has been installed already. For installation procedures see section 2. Osprey Installation
| 3.1 Types of Files Opened by Osprey |
Osprey can load the following three different file formats:
1.) Osprey File (for details see section 3.1.1 Osprey File)
2.) Custom Gene Network (for details see section 3.1.2 Custom File)
3.) Gene List (for details see section 3.1.3 Gene List)
| 3.1.1 Osprey File |
The Osprey file format is a tab delimited text file that contains all the necessary information to reinitialize a saved network. The text file is saved with a .osp extension to set it apart from all the other text files. Any manipulation of this file will cause serious problems with your network and could ultimately result in a unrecoverable file. So it is in your best interest to leave this file alone and manipulate your graph only through the Osprey program.
| 3.1.2 Custom File |
The Custom file format is a tab delimited text file that allows the user to load personal interaction data. Osprey recognizes both .txt extentions as well as .ocg (Osprey Custom Graph) file extentions. With this format the user can quickly import their data into Osprey and use the interactions available from any of the other three file formats available to Osprey as well as the published interactions found in The GRID. Osprey can currently recognize four different variations of custom files.
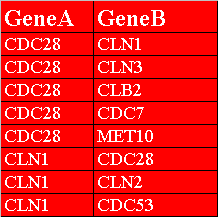
Direction is implicitly defined to go from "GeneA" to "GeneB". Osprey represents the direction by placing an arrow at one end of the edge to represent the direction. A double headed arrow indicates the interaction was shown both ways. For example in Figure 3.2.3.1-1 row 2 shows "CDC28" interacting with "CLN1" and row 7 shows "CLN1" also interacts with "CDC28". Figure 3.1.2.1-2 show the resulting double headed arrow on the edge connecting "CLN1" and "CDC28".
Osprey will accept any string placed into the columns. Blanks are not accepted in any columns indicated with the colour red.
Sections 3.1.2.1 to 3.1.2.4 demonstrate the different variations in the custom interaction format that Osprey currently accepts.
| 3.1.2.1 Custom File Variation #1 |
The first row in figure 3.1.2.1-1 contains the headers, "GeneA" and "GeneB", of the two columns that must exist in this variation of a custom interaction file. The two columns represent the different interacting pairs that will be loaded into Osprey. Figure 3.1.2.1-2 demonstrate what the network would look like after opening it up in Osprey.
Note: The rows and columns in red are necessary where as the rows and columns in gray are optional.

Figure 3.1.2.1-1 Custom File Variation #1
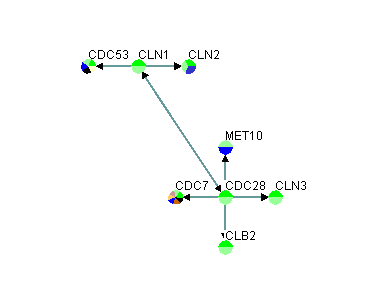
Figure 3.1.2.1-2 Result of loading custom file variation #1 into Osprey
| 3.1.2.2 Custom File Variation #2 |
The first row in figure 3.1.2.2-1 contains the headers, "GeneA", "GeneB", "GeneA Screen Name", and "GeneB Screen Name", of the four columns that must exist in this variation of a custom interaction file. The first two columns represent the different interacting pairs that will be loaded into Osprey. The third and fourth columns represent the names that will be displayed on the screen. Figure 3.1.2.2-2 demonstrate what the network would look like after opening it up in Osprey.
Note: The rows and columns in red are necessary. The rows and columns in gray are optional. You can choose to only change the grey rows that need changing.

Figure 3.1.2.2-1 Custom File Variation #2
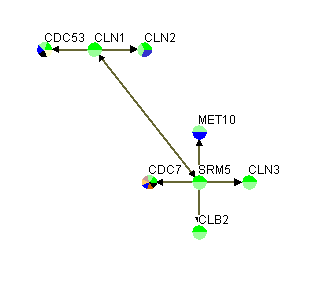
Figure 3.1.2.2-2 Result of loading custom file variation #2 into Osprey
| 3.1.2.3 Custom File Variation #3 |
The first row in figure 3.1.2.3-1 contains the headers, "GeneA", "GeneB", "Experimental System", "Source", and "PubMed ID", of the five columns that must exist in this variation of a custom interaction file. The first two columns represent the different interacting pairs that will be loaded into Osprey. The last three columns contain details about the interactions. The third column contains the "Experimental System", the system used to identify the interaction. The fourth column contains the source where the interaction was found. The fifth column contains the "PubMed ID" of any papers that backs this interaction up, multiple PubMed ID's are separated with semicolons. Figure 3.1.2.3-2 demonstrates what the network would look like after opening it up in Osprey.
The variations of the custom files described in sections 3.1.2.1 Custom File Variation #1 and 3.1.2.2 Custom File Variation #2 lack the last three columns describing the specifics of the interactions. The lack of these three columns forces Osprey to place the interactions into a "CUSTOM" mode. By supplying Osprey with these additional three columns you will be able to take advantage of the built in network filters described in section 5.1 Network Filters.
Note: The rows and columns in red are necessary. The rows and columns in gray are optional. You can choose to only change the grey rows that need changing.

Figure 3.1.2.3-1 Custom File Variation #3
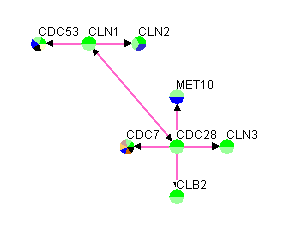
Figure 3.1.2.3-2 Result of loading custom file variation #3 into Osprey
| 3.1.2.4 Custom File Variation #4 |
The first row in figure 3.1.2.4-1 contains the headers, "GeneA", "GeneB", "GeneA Screen Name", "GeneB Screen Name", "Experimental System", "Source", and "PubMed ID", of the seven columns that must exist in this variation of a custom interaction file. This variation of the custom interaction file contains all the previous variations of the custom interaction files. See sections 3.1.2.2 Custom File Variation #2 and 3.1.2.3 Custom File Variation #3 for information of the different variations of the custom interaction files. Figure 3.1.2.4-2 demonstrates what the network would look like after opening it up in Osprey.
Note: The rows and columns in red are necessary. The rows and columns in gray are optional. You can choose to only change the grey rows that need changing.

Figure 3.1.2.4-1 Custom File Variation #4
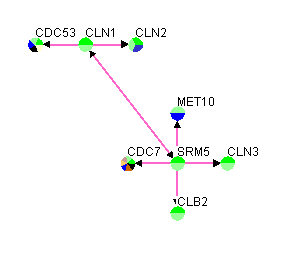
Figure 3.1.2.4-2 Result of loading custom file variation #4 into Osprey
| 3.1.3 Gene List |
The Gene List format is a tab delimited text file that allows the user to load lists of genes into Osprey. Osprey recognizes both .txt extensions as well as .gl (Gene List) file extensions. With this format the user can quickly import their genes of interest into Osprey and use the interactions available from any of the other three file formats available to Osprey as well as the published interactions found in The GRID. Osprey can currently recognize two different variations of gene list files.
Osprey will accept any string placed in the columns except blanks.
Sections 3.1.3.1 Gene List Variation #1 and 3.1.3.2 Gene List Variation #2 demonstrate the different variations in the custom interaction format that Osprey currently accepts.
| 3.1.3.1 Gene List Variation #1 |
The first row in figure 3.1.3.1-1 contains the header, "Gene", that must exist in this variation of the gene list file. Figure 3.1.3.1-2 demonstrates what the network would look like after opening the gene list in Osprey.
Note: The rows and columns in red are necessary. The rows and columns in gray are optional. You can choose to only change the grey rows that need changing.
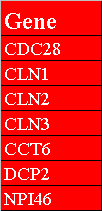
Figure 3.1.3.1-1 Gene List Variation #1
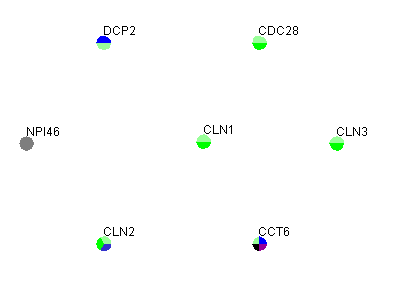
Figure 3.1.3.1-2 Result of loading gene list from figure 3.1.3.1-1 into Osprey
| 3.1.3.2 Gene List Variation #2 |
The first row in figure 3.1.3.2-1 contains the headers, "Gene" and "Screen Name", that must exist in this variation of the gene list file. The screen name allows the user to change the name viewed on the network. Figure 3.1.3.2-2 demonstrates what the network would look like after opening the gene list in Osprey.
Note: The rows and columns in red are necessary. The rows and columns in gray are optional. You can choose to only change the grey rows that need changing.
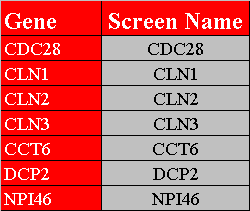
Figure 3.1.3.2-1 Gene List Variation #2

Figure 3.1.3.2-2 Result of loading gene list from figure 3.1.3.2-1 into Osprey
| 3.1.4 Opening Datasets |
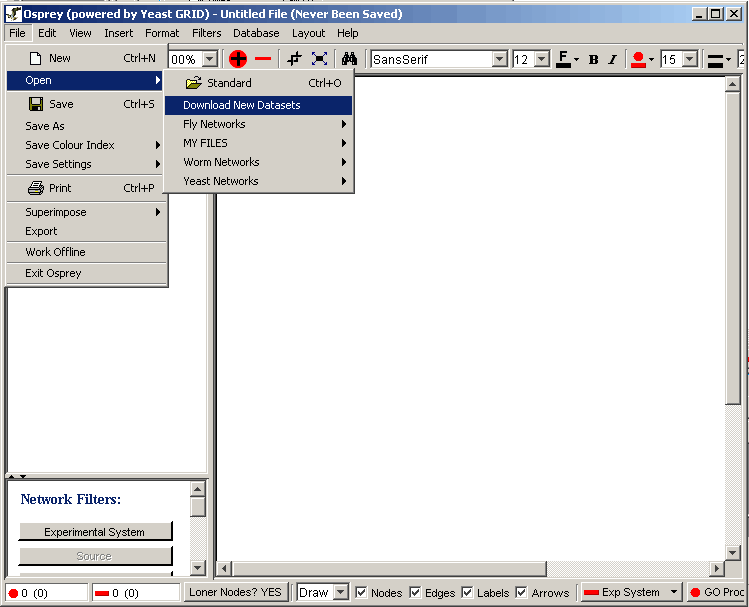
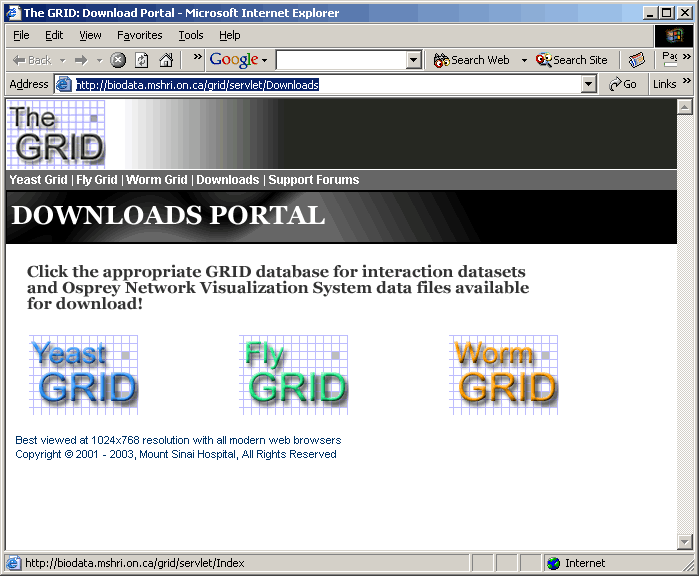
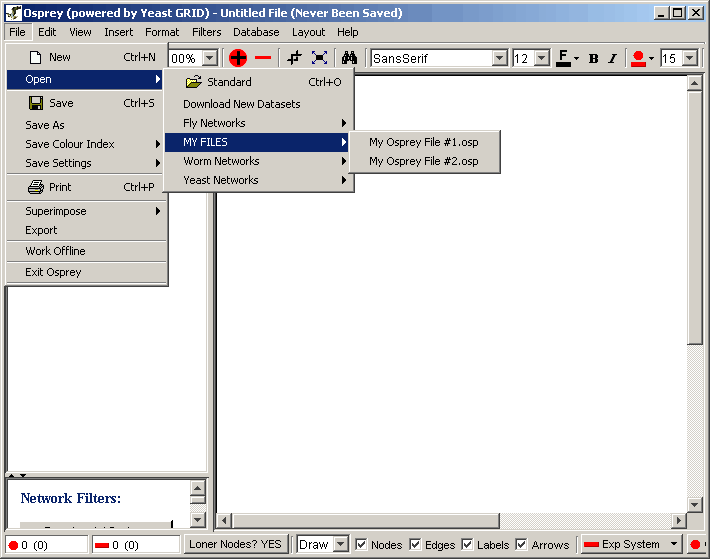
Osprey comes with a set of well known datasets already built-in for quick access. These datasets are derived from both experimental systems and sources currently stored in the GRID. The datasets have been grouped into different menu items based on the organisms they belong to. As of Osprey 1.2.0, the number of organisms containing interaction data in the grid include: Yeast, Fly, and Worm. The datasets can be opened from the Menu bar, see figure 3.1.4-1.
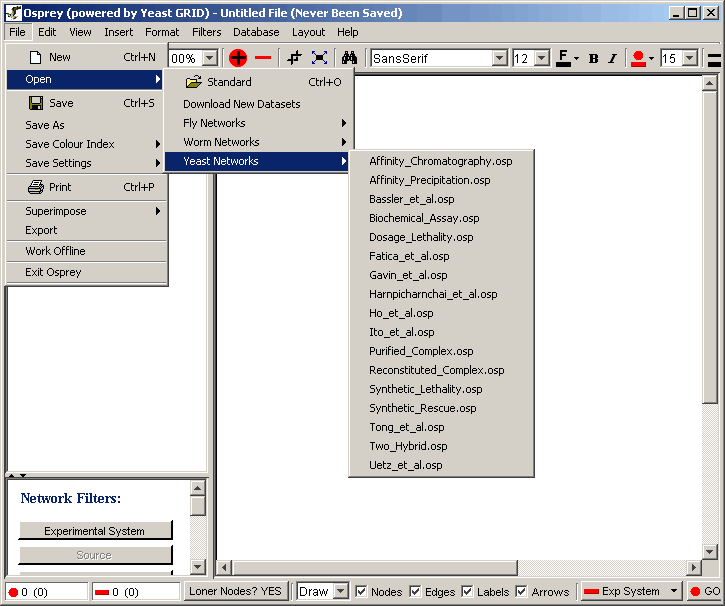
Figure 3.1.4 - 1 Open Dataset
| 3.1.4.1 Downloading new datasets |
| 3.1.4.2 Adding personal datasets |
| 3.1.5 Superimposing Datasets |
Osprey offers you the option of superimposing (or adding) two or more datasets on top of each other. This feature can be very helpful for comparing data created by different sources or using different experimental systems. Osprey can superimpose all three of the accepted file formats including the built in datasets. See section 3.1 Types of Files Opened by Osprey for a description of the types of files that can be superimposed.
Follow these steps to superimpose datasets:
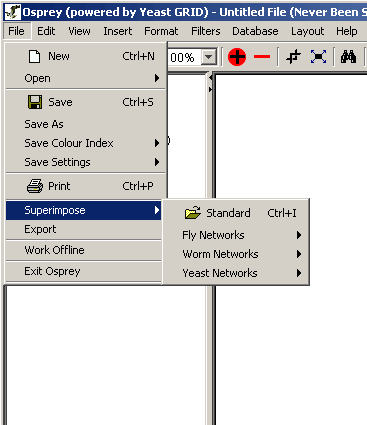
Figure 3.1.5 - 1 Superimpose dataset
| 3.2 Saving to Osprey Files ( .osp ) |
Any opened Osprey file can be saved as a tab delimited text file with the .osp file extension. When saved, the next time the file is opened it will remember the location and formatting of all the visible nodes. To save an Osprey file follow these steps:
Note: Filtering information and currently invisible nodes will not be saved to the .osp file, only the visible nodes and interactions will be saved.
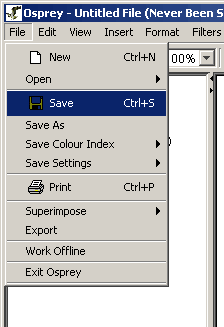
Figure 3.2 - 1 Save
To save a file under another name
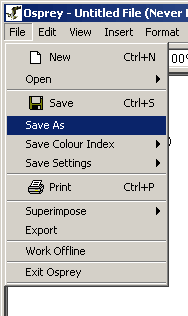
Figure 3.2 - 2 Save As
| 3.3 Exporting |
Osprey offers the option of exporting osprey networks to image files. This feature allows users to manipulate the images and use them in presentations and publications.
| 3.3.1 Image Types |
Osprey networks can be exported as images. There are currently three formats that Osprey can export to:
1.) JPEG (for details see section 3.3.1.1 JPEG)
2.) PNG (for details see section 3.3.1.2 PNG)
3.) SVG (for details see section 3.3.1.3 SVG)
| 3.3.1.1 JPEG |
JPEG (Joint Photographic Experts Group) is an ISO/IEC group of experts that develops and maintains standards for a suite of compression algorithms for computer image files. [http://searchwebservices.techtarget.com/sDefinition/0,,sid26_gci212425,00.html]
| 3.3.1.2 PNG |
PNG (pronounced ping as in ping-pong; for Portable Network Graphics) is a file format for image compression that, in time, is expected to replace the Graphics Interchange Format (GIF) that is widely used on today's Internet. Owned by Unisys, the GIF format and its usage in image-handling software involves licensing or other legal considerations. (Web users can make, view, and send GIF files freely but they can't develop software that builds them without an arrangement with Unisys.) The PNG format, on the other hand, was developed by an Internet committee expressly to be patent-free. It provides a number of improvements over the GIF format. [http://searchwebservices.techtarget.com/sDefinition/0,,sid26_gci214307,00.html]
| 3.3.1.3 SVG (Scalable Vector Graphics) |
Scalable Vector Graphics (SVG) is the description of an image as an application of the Extensible Markup Language (XML). Any program such as a Web browser that recognizes XML can display the image using the information provided in the SVG format. vector graphics is the expression of an image using mathematical statements rather than a bit-pattern description. Scalable emphasizes that vector graphic images can easily be made scalable (whereas an image specified in raster graphics is a fixed-size bitmap). Thus, the SVG format enables the viewing of an image on a computer display of any size and resolution, whether a tiny LCD screen in a cell phone or a large CRT display in a workstation. In addition to ease of size reduction and enlargement, SVG allows text within images to be recognized as such, so that the text can be located by a search engine and easily translated into other languages. [http://searchwebservices.techtarget.com/sDefinition/0,,sid26_gci342078,00.html]
| 3.3.2 Matrix |
This option returns a tab delimited text file of all the interacting genes in the network. An interaction between two genes is represented by a 1 and those that don't interact by a 0. This file format can be used in several different clustering programs to help get a different perspective of the network.
| 3.3.3 How to Export |
To export Osprey networks to images follow the 3 easy steps:
1.) Click on the "File" Menu bar
2.) Click on Export
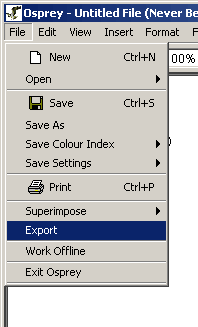
Figure 3.3.3-1 File Menu demonstrating how to export a Osprey network to an image
3.) Choose which of the four formats you want to export your Network to
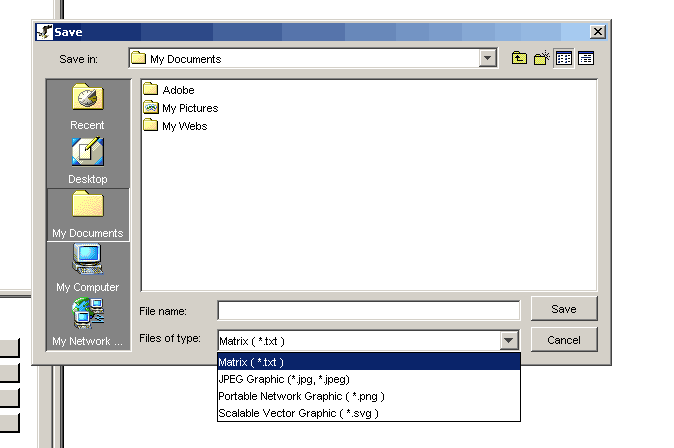
Figure 3.3.3-2 Save File dialog
demonstrating the four different file formats available for exporting
images
The Osprey Administrator
E-mail: ospreyadmin@mshri.on.ca
Go to the table of contents